The Secret to Starting Seeds Indoors: How to Moisten Seed Starter Mix the Right Way
Every year, as winter starts to fade, I get excited to begin starting seeds indoors. There’s something magical about watching those tiny green sprouts push through the soil, promising a lush garden to come. But every year, I also seem to face the same aggravating problem: moistening seed starter mix.
If you’ve ever poured water over your freshly planted seeds only to watch them float to the surface like little lifeboats, you know exactly what I mean. You might have even thought, like I did, that your soil was defective.
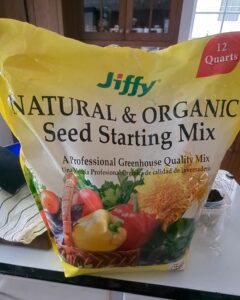
This year, my husband and I thought we had finally cracked the code. We researched and bought the Jiffy Natural & Organic Seed Starter Mix (available on Amazon), believing this premium blend would end our struggles. But guess what? The same floating seeds and dry spots happened all over again.
So, I did more digging (pun intended), and I finally found the answer. It’s so simple that I couldn’t believe I hadn’t been doing this all along:
At www.retiregal.com, we’re committed to providing valuable solutions. We include carefully chosen affiliate products and services and when you purchase through these links, we may earn a commission at no extra cost to you. Your support helps us continue offering quality content. We only recommend products and services we truly believe in.
Moisten Your Seed Starter Mix BEFORE Filling Your Pots
This is the number one trick. Don’t skip it. Don’t think you can water after planting. Don’t trust that the soil will just absorb the moisture later. Seed starter mix is designed to be light and airy, which is great for delicate roots, but makes it incredibly hydrophobic (resistant to water) when dry.
If you dump water into a pot full of dry starter seed soil mix, it won’t absorb any time soon—it could take two whole days or more, depending on the size of your pot!
How to Moisten Seed Starter Mix Properly:
Measure Your Soil First:
If you don’t need the whole bag, fill your pots or seed trays with dry mix to see how much you need.
Dump the measured soil into a big bowl, bucket, or tub.
(Seed starter mix is usually sterile, but check your particular bag to confirm.)
Add Water Gradually:
Start with a little water. Don’t drench it all at once.
Stir with your hands, a trowel, or a large spoon.
Mix, Mix, Mix:
It will feel like you’re making brownie batter.
Keep mixing until the color darkens, and the soil feels heavier.
It should be damp but not dripping wet. You should be able to squeeze it into a ball, and it will stay together without oozing water.
Fill Your Pots:
Once the mix is damp and crumbly, fill your pots or seed trays.
Press the soil down gently to remove air pockets, but don’t compact it.
Ensure your pots have adequate drainage holes to allow for bottom watering later. Without holes, excess water will accumulate, leading to soggy soil and root rot.
Plant Your Seeds:
Now, plant your seeds at the recommended depth.
Avoid watering from the top. Top watering can dislodge seeds, cause soil compaction, and lead to fungal issues like damping off.
When to Water Again: Keeping Soil Moist Without Overwatering
Proper watering after your seeds are planted is just as important as moistening your seed starter mix beforehand. You don’t want your soil to dry out completely, but overwatering can lead to mold and root rot. Here’s how to find the right balance:
Watch the Surface: When the top of the soil begins to look paler and dry, that’s your first sign that moisture is running low. Don’t water immediately—wait about one more day.
Water from Beneath: Fill a tray or shallow container with water to about ¼ of the height of your pots or seed trays. Ensure your pots have drainage holes to allow the soil to wick up moisture from the bottom. Place your pots in the water and let the soil soak up moisture from the bottom for about an hour.
Drain the Excess: After the hour is up, remove your pots and dump any leftover water. This prevents oversaturation and root rot.
Let the Top Dry Slightly: Allowing the surface to dry out between waterings helps prevent mold and fungus growth. This top-dry approach keeps your seedlings healthy.
Starting Seeds Indoors: Timing for Different Plants
While we’re at it, let’s talk about when to start seeds indoors. Timing is everything.
Here’s a quick guideline based on when your average last frost date is (find yours here):
8-12 weeks before last frost:
Peppers
Eggplant
Celery
6-8 weeks before last frost:
Tomatoes
Broccoli
Cabbage
Herbs (like basil, parsley, and oregano)
4-6 weeks before last frost:
Lettuce
Kale
Chard
2-4 weeks before last frost:
Cucumbers
Squash
Pumpkins
Zinnias
Indoor Growing Temps & Lights
Temperature: Most seeds germinate well between 65°F – 75°F.
💢Plant Warmer Mat (needed if you lower home temps at night!)
Light: Once germinated, seedlings need 12-16 hours of bright light daily. Consider using grow lights if you don’t have a sunny south-facing window. I like this affordable LED grow light on Amazon — it’s been a game-changer for my seedlings.
Helpful Tip: Use a Fan to Strengthen Seedlings
One of the best ways to prevent weak, spindly stems is to introduce airflow. Placing a small fan near your seedlings on a low setting mimics outdoor breezes, encouraging your plants to develop stronger stems.
Why It Works: The gentle movement causes the seedlings to build resilience and toughness, preparing them for outdoor conditions.
How to Use: Run the fan for a few hours a day, ensuring it’s not too strong. You want a gentle rustling, not a windstorm.
Why I Recommend Jiffy Natural & Organic Seed Starter Mix
As an Amazon affiliate, I earn from qualifying purchases, but I genuinely recommend this mix. It’s made from sphagnum peat moss, coconut coir, and perlite, providing excellent aeration and moisture retention—once you actually get it moist!
Final Pro Tip: Don’t Skip Moistening the Seed Mix!
I know it’s tempting to just scoop dry mix into your pots and go, but trust me: moisten your seed starter mix first. You’ll avoid the frustration of floating seeds, and your seedlings will thank you with healthy, vigorous growth.
Happy planting!